January 19, 2023

Quick Fix – Squeaky Herman Miller Aeron Chair

Recently, I was on the cusp of selling my beloved size B Herman Miller Aeron chair, a staple in office seating for more than 20 years now. I had purchased it second-hand a few years back for about $125, so although it was extremely comfortable and wildly adjustable, I wasn't terribly attached to it due to its major squeaking issues.

When I sat down: squeaks; when I stood up: squeaks; when I adjusted my seating position: squeaks. I thought I had had enough. I listed the Aeron on Facebook Marketplace for $200, a reasonable (but decidedly low) price, and was inundated with tens of interested parties - perhaps I should've aimed higher. After doing hours of research on alternatives in the $3-400 price range, I discovered my butt was already in the best (chair), and decided not to sell. So I went to work tracking down squeaks...

To do so, I purchased a can of spray-on teflon dry-film lubricant by Dupont, for a tidy $9 USD. After some quick research on teflon and silicone sprays, it seemed the best option, and I could tackle some squeaky door hinges at home after the chair was taken care of. The "dry-film" characteristic of this spray meant I could apply to hinges, etc. and not worry too much about dripping, since all the squeaking issues resided in carpeted areas.

Once I had sprayed every joint and hinge on the Aeron, I still heard squeaking. I couldn't figure out where the noise was coming from, and was worried I'd have to disassemble something to get the squeaks to be silenced. Luckily, I came across a post online which revealed the holy grail of de-squeakifying Aeron chairs: lubricating just four screws.

Here are the four screws highlighted, on the back of the chair:

Aeron chair screw positions for lubrication

To de-squeak: remove each screw one-by-one, wipe with a soft cloth, spray with lubricant, and re-insert, tightening firmly by hand. Yes, it's that easy.

Note that the lubricant linked above was also sprayed on every hinge, connection point, wheel, and piston on the chair, and that all probably helped a bit for smaller squeaks. No issues so far.

Hope this helps folks out there with squeaky chairs. Don't sell that original Aeron!

October 7, 2022

Classic Macintoshes, Part I

Wherein Chris acquired a 20th Anniversary Mac and G4 Cube in one day

An original G4 Cube with monitor, Apple Pro keyboard, and speakers. The full set!

I won't go into too much detail around how I acquired these, but they were part of a collection and they were far below resale. These were acquired to be part of a more permanent home collection.

Power Mac G4 Cube Delivers G4 Performance in an Eight Inch Cube

Apple, 2000 https://www.apple.com/newsroom/2000/07/19Apple-Introduces-Revolutionary/

At the Macworld Expo in July 2000, Apple revealed what might be its most interesting computer form factor: the G4 Cube. Aimed at pro users and oozing with power (for its time), the G4 Cube required no cooling fan, allowed for quick-swapping of components via a lift-out design, and was a true design statement, preceding even the iconic 2001 iPod. Starting at $1,799 ($3,000 in 2022 dollars), the Cube was relatively expensive - but have pro users with deep pockets ever complained?

When I first laid eyes on the Cube in person, I was rushed back to my childhood days, and to memories of a G4 Cube on my father's workplace desk. Even as a child, it was a marvel, a curiosity, a "black box" of technology I'm still impressed with. I knew I had to have it. Luckily enough, the collector I was purchasing from had the foresight to complete the set; the Cube came with the beautiful black Pro keyboard and mouse, spherical speakers, and 16-inch CRT (!!) Studio Display. I was overjoyed when I got home and powered it on - another throwback to interfaces, colors, and applications (hello, Sherlock) I thought I had forgotten. Nostalgia plays a huge part in Mac collecting, and this was a prime example.

The G4 Cube in use

Powering up the G4 Cube was an experience all its own, too; the familiar Apple chime, a loading bar I hadn't seen in 15 years, and applications lost to history. Everything worked, which was nothing short of a miracle. Not much else to say here, really.

Now to the main event, one of the rarest and most sought-after Macs I've ever had the pleasure of seeing and owning: the Twentieth Anniversary Macintosh. Speaking of unique designs... Built to celebrate the twentieth anniversary of the Macintosh computer and starting at an eye-watering $9,999 (later $1,999), this special edition was made to be collected. I'd assume most were turned on, used, abused, and eventually lost to the ages, but there are a few out there, and I was ecstatic to have even seen (and owned) one.

Tucked away in a corner, the seller acting on behalf of the collector had no real idea what this computer meant, or how rare it was. To be fair, until I got home and did more research, I just thought it was unique. It was, and it still is. Unopened versions of this computer and its peripherals still go for close to $20,000 on eBay. Wild!

The 20th Anniversary Mac in use

The 20AM's form factor was odd in and of itself, as was its keyboard/mouse setup and subwoofer (yep, that's what that monolith is). While this sparkling example now lives with another collector, it was another instance of "wow, how far we've come". The 20AM was also running Mac OS 9, like the Cube, and while I usually "start fresh" and wipe the hard drive of computers I collect first thing, I knew how special this was, and was not about to ruin a very clean time capsule. I left it alone, excited for the next owner to behold Mac OS 9 and a plethora of very poorly-aged Adobe design products.

I was lucky to find not just the computer and subwoofer, but the Apple remote, keyboard-mouse combo, and original manual for this Mac. A real score would've been to have found the original boxes too, which were a statement to say the least.

The 20th Anniversary Mac boxes. Hell of a find, if you come across a set, even an empty set.

To think that Apple will not make a computer that looks this interesting ever again - even a special edition, at that - is a hard pill to swallow. The Cube and 20AM, alongside the color spectrum iMacs, were an era of design that was so appropriate for the time, and while it's difficult to say: unique designs like this are likely to remain few and far between.

If anything, we can appreciate and marvel at what Apple was able to do before bean-counters and mass-production were so prevalent - not to say that Apple's Trash Can Mac Pro, current Mac Pro, and Studio Display aren't striking.

Finally, let's take a quick walk down a different memory lane, where Apple made a foray into portable computers early on in the company's history. Enter the Macintosh Portable: with its own carrying case, removable battery, and clicky keyboard that would make even the PCMR perk up, this thing was, well, massive. Unwieldy. Heavy. Remember track balls?

The Macintosh Portable, with not one but TWO SPACEBARS!

This was also a computer that came with the aforementioned Cube and 20AM (aka TAM). I could never manage to get it (or its massive 2GB hard drive) to boot properly due to a screen and/or battery issue, but before it was sent on its way, it was yet another cool nostalgia piece.

Unfortunately, you can't keep all the cool Macs, every time, unless you've got deep pockets, and this was one of those times when fiscal sense prevailed. I hope its new owner has a charger.

September 11, 2020

Zombie Power Mac G5

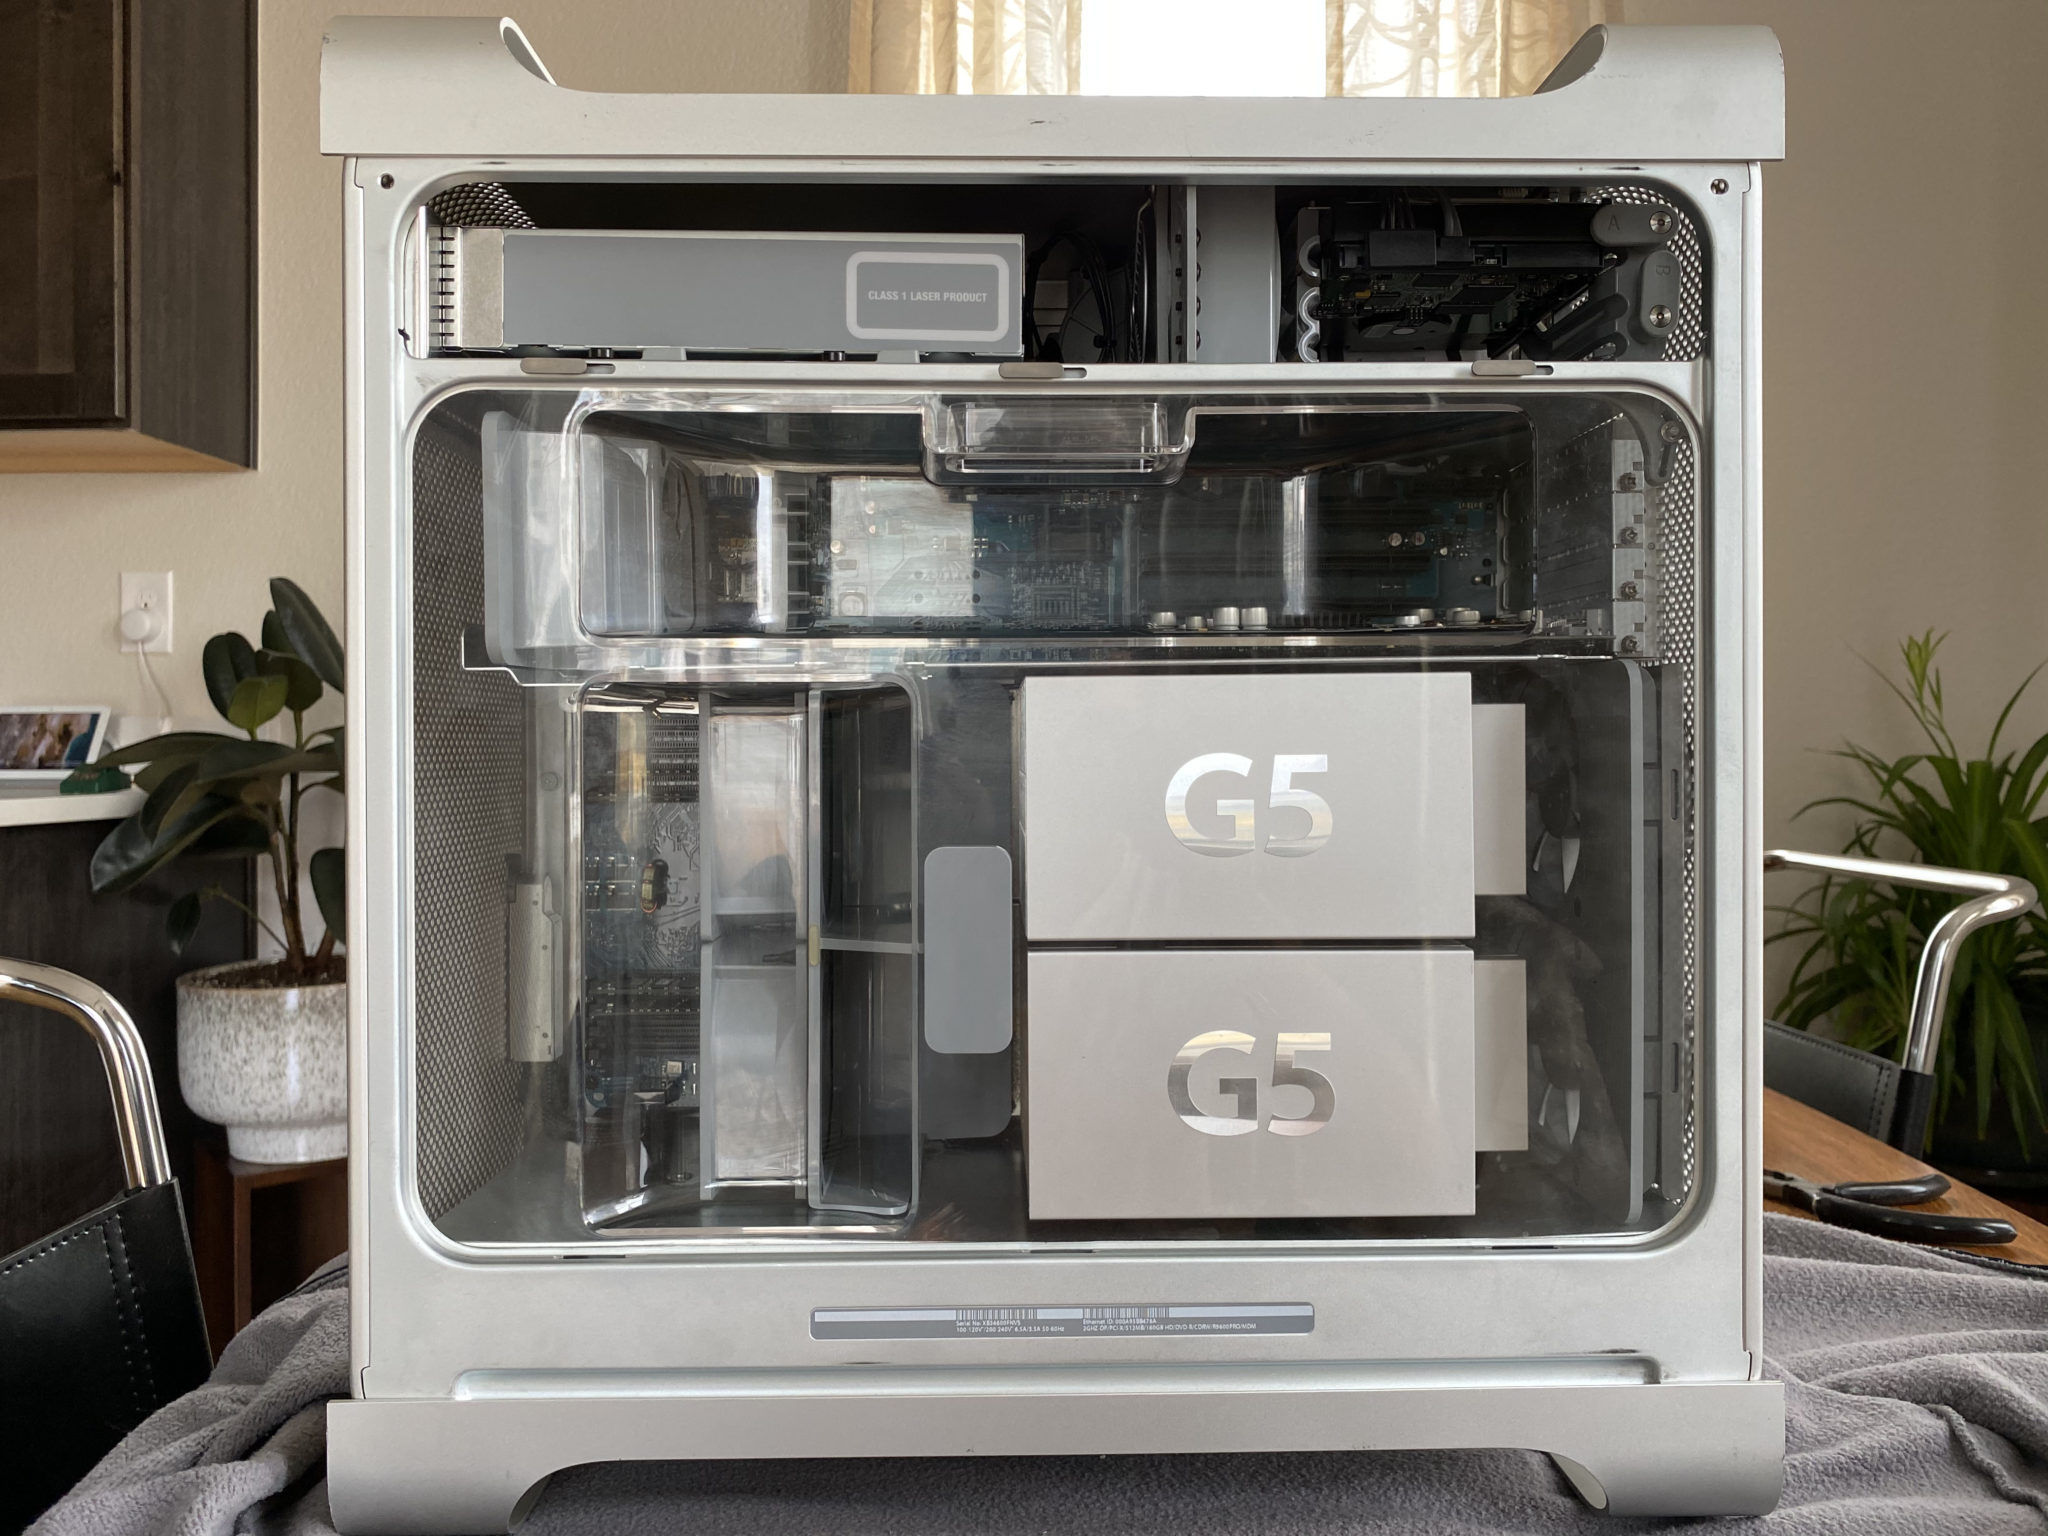
History of the Power Mac

Back in 2003, Apple's Power Mac G5 was a dual-core monster; with a dual 2.0GHz processor and up to 8GB of 400MHz DDR RAM, it pales in comparison to any Apple computer on sale today, but remains one of the greats in Apple's storied portfolio of consumer design successes.

Building on the success of the then-recent Power Mac G4 and G4 Cube, Apple decided it was time to further simplify their pro-sumer lineup with a brand-new design in 2003, with the announcement of the Power Mac G5 tower. As design head Jony Ive stated in an interview regarding the G5: "We wanted to get rid of anything other than what was absolutely essential," and that they absolutely did.

I've long admired the Power Mac design, which persisted from the days of PowerPC (1994 - 2005) until Apple's transition to Intel processors (2006), all the way up to the "trash can" redesign in 2013. I stumbled across a well-priced storage unit purchase a seller didn't know much about, and decided to jump on a "COVID project", which ended up being simpler than I expected.

This Particular Power Mac

This Mac's model identifiers are as follows:

  • Model PowerMac 7,2
  • Sold as M9032LL/A
  • Apple Device ID A1047 (EMC 1969)
  • Serial number XB346600FNVS

And its specifications after the build was complete:

  • Dual-core PowerPC G5 processors running at 2.0GHz
  • 1.5GB 400MHz PC3200 DDR SDRAM
  • Apple AirPort Extreme 802.11G Wifi card
  • AMD Radeon 9600 Pro graphics card with 64MB of VRAM
  • 160GB SATA 1.5Gbps Hard Drive
  • 4X DVD/CD SuperDrive
  • Lots of ports, like Firewire 400/800, optical audio in/out, and Ethernet
  • A special DisplayPort which provided power and video signal

The Full Disassembly

When I picked this up from a random stranger's garage, I had no idea what to expect. "How dusty is this thing," I wondered, "and how much money am I actually going to be willing to invest to get a computer of legal driving age to turn on? The answers were "extremely" and "about $50".

Heavy and unwieldy as it was, I managed to get the Power Mac home in one piece, and popped open the side panel to reveal something that looked like a scene from the movie "Dune".

power Mac g5 inner side dusty
Any sandworms in there? Beetlejuice?

Not to be deterred from the $80 I sunk into the tower and its very dated 20-inch 1680x1050 monitor, I began the process of disassembly by removing the plastic cover - which (fun fact) is required for air to flow properly through the case.

The first step was to remove the fan module immediately to the left of the dual G5 processors, indicated by the small rectangular handle. Simply pulling firmly on the module removes it; note the connector slides directly into and out of its port on the motherboard, requiring no additional unclasping.

power Mac g5 inner empty
Mostly disassembled, and not quite clean.

To the top left of the fan module I just removed was a single fan and speaker module, which provided airflow to the graphics card(s) and acted as the single built-in audio source on the tower. This fan module sits in the left-most horizontal divot in the center of the tower.

Next, I removed that upper fan module by depressing the clip and sliding it towards myself, out of the tower. This required a bit of force. This module has a wired and clipped connection to the motherboard, which requires using a small screwdriver and minimal force to free.

With most of the major bits and bobs out of the case, I removed the RAM modules, which are pretty obvious but directly below the single fan assembly in four horizontal rows. When inserting RAM back in upon reassembly, be sure to use matched pairs (equal MB/GB sizes) starting in slots 2 and 3, with 1 being the top-most and 4 being the bottom-most slot.

On the top right of the case, you'll find the hard drive bays, one of which in this case was occupied by a still-spinning OEM hard drive. To remove this, I flipped the "A" tab clockwise until it was at the 12:00 position, slid the hard drive towards the case opening, and disconnected the power/data cables prior to fully removing it from the case.

power Mac g5 ram slots
Shown: the four RAM slots, from left to right, 4-3-2-1. Top right: AirPort Extreme slot and antenna connector.

Below the hard drive bays is a set of expansion slots, one of which was occupied by a graphics card. To remove the graphics card, I removed the single screw near the right edge of the case, and gently wiggled the card free from its horizontal connector.

To remove the SuperDrive, I rotated the two grey tabs clockwise 90 degrees, and slid the drive free from the case. Note there are also cables attached here, which will need to be disconnected prior to removal.

Now came the tough part: removing the processors. First you've got the G5 processor covers, a cosmetic detail I'm happy Apple added, but be aware the clips are extremely delicate. I broke 3 of the four clips on each after all was said and done.

I would highly recommend laying the Power Mac on its side (largest flat side, with the Apple logo) prior to removing the processors. Using a long (6 inch) Phillips screwdriver extender and a nice grippy screwdriver handle, I removed the four screws on each processor, down the top and bottom channels. Note the screws are the ones attached to the motherboard posts, on the thickest metal parts of the processor/heatsink assemblies.

Once I removed four screws from the bottom processor (easier to do that one first), it was easy to gently pull the processor directly towards myself, out of the case. If this proves difficult, there may be an additional small screw at the bottom left of the lower processor. Also note the processor pins are located on the motherboard, and are easily bent. Be careful if you attempt this yourself!

I wanted to disassemble the processors at this point due to the massive amounts of dust, and in order to clean and re-apply thermal paste. This was easy enough once the processors were removed: only four hex screws keep the processor attached to the massive heatsink. There are also two small clips and adhesive on the back side of the heatsink, which needed to be detached in order to take this circuit board off.

power Mac g5 processor underside
The inner four hex screws keep the processor attached to the heatsink. The two posts on the underside here helped line up the processors and pins when I moved them back into the tower.

The final fan assembly was on the far right against the back of the case, and was removed by freeing the clips near the case opening, after the processors were removed.

So what was left? "Oh crap," I thought, "the power supply." Not a difficult item to remove, though it takes up the entirety of the bottom of the interior: just two screws on the plate covering the power supply inside the tower, and voila! I was ready to remove the three large cable clips on the bottom of the motherboard. These are heavy-duty cables and clips, so I recommend taking your time to see how and where these sit when removing the power supply.

power Mac g5 inner empty plugs
The left connectors are below the RAM slots are black, and the last on the far right is white/clear. In this photo, the right-most fan is still installed.

Once the two screws and power cables are free, removing the plate covering the power supply required a bit of creative twisting, but was more difficult to get back in than out.

To remove the power supply unit, remove the four screws on the underside of the tower, re-orient the tower standing up, then tilt the power supply away from you and pull it out of the case. Be aware of the cables you just disconnected - they caused me a bit of trouble.

Finally, I was finished! Not really, though... hours of high-pressure air, non-static microfiber rags, a new PRAM battery, and plenty of patience later, I was actually ready to reassemble. I followed the steps above backwards, and it wasn't too bad of a reassembly process.

Once the power cable arrived a few days later, I was ready to press the power button and hope to God (!) all my effort was not in vain!

power Mac g5 and monitor boot
IT LIVES!!

Thankfully, it booted as expected, and after wiping the hard drive of the previous owners' files (lots of pirated content and acid jazz concert recordings) I was in nostalgia heaven. Sherlock! Old Finder! The Aqua interface! What a ride.

Final Thoughts and Tips

My last little project on this computer was the AirPort Extreme antenna: a part which anywhere will cost you $40 because it's a special T-shaped connector that was made for the Power Mac line. I couldn't find a suitable replacement anywhere on Amazon, so I opted for a solution another user suggested on Apple's support forums: a large safety pin.

safety pin wifi antenna
Yep, it worked!

This particular model didn't have a Bluetooth card, but a Logitech keyboard with wireless USB adapter did well enough for typing when needed post-boot.

Final thought: you should be pretty handy if you attempt this yourself, but it's not a whole lot more than screws and silicon. Worst case, you have a pretty paperweight, or you can sell it to a PC builder. Apparently these cases work well with specific motherboards in PC builds due to the post configuration and the case's general timeless attractiveness.

Thanks for reading!

Thanks to EveryMac's Power Mac G5 page, Mac Parts Depot, and Other World Computing for the parts and details! This thread on iFixit also helped, despite it being a teardown for a water-cooled Power Mac.

July 31, 2018

The Importance of Analytics

Why Analytics?

Disclaimer: this was written with Google's 360 Suite of tools in mind, but a large portion of the concepts can be applied to nearly any analytics implementation.

At its core, Analytics – tracked and reported via Google Analytics, Google Tag Manager, SalesForce MC, Tealium, Ensighten, Adobe Analytics, whichever tool you decide to use – should be an ongoing effort at the core of any digital marketing organization. Involve as many parts of the business as possible: input from each group, including IT, marketing, and data science is important in defining and optimizing processes which make analytics a success, otherwise an organization-wide data-driven mindset cannot possibly thrive.

Being “data-driven” is more than knowing how data is captured, building tagging, monitoring, normalizing, and reporting – it’s about thinking critically about all the angles. Even the least technically-minded person can and should be taking part in asking questions, learning about tools, and becoming at least incrementally involved in the data-gathering process.

Analytics as a Mindset

As a mindset, Analytics means asking the difficult questions and challenging what some might refer to as “what we think we know”. If the data you see differs from what others expect or have seen, perhaps a landscape is changing and it’s an opportunity for you to tell that story. Most of the time, user behavior follows a trend (whether seasonal or cyclical), so keep that in mind when investigating and reporting anomalies. Spikes in data can be anything from bot traffic to legitimate business; therefore, part of an analytical mindset is not only questioning what you see, but validating what you say. Be skeptical, but do your due diligence and know your sources. Don't let your analysis slow you down. Unless you have a specific reason to believe data isn’t correct, there’s a very good chance it is.

Analytics needs to be thought upon throughout all parts of the marketing funnel, whether that means adding UTM parameters to an email campaign, tagging a new feature, or dynamically remarketing to users who have visited your website. (Did someone say "abandoned carts"?) Without analytics, it’s impossible to quantify the success of your efforts. When your stakeholders ask, “What’s the rate of return on new features we’re providing for our customers?” – Analytics helps answer those questions directly! Similar questions will be easy to answer, like, “Are customers using this new feature we spent months to build and deploy?” or “Did this outreach campaign drive relevant traffic and action to the correct parts of the website?” once we use insights to precede decisions.

In the end, it’s up to each part of a company to think about analytics and data collaboratively, since data drives results, and should in theory move the business forward. A great deal of this involves self-motivated learning through trainings, typically held by an internal analytics resource, where employees can ask questions, walk through ad-hoc reporting, and learn about new tracking additions. 

I'm sure some old adage goes, “Give a marketer a GA report, and they'll look at numbers for a day. Teach a marketer to use GA, and they'll discover deep insights for a lifetime.” See? This is why I'm an analytics geek and not a philosopher. I digress.

Analytics as a Process

As a process, Analytics means integrating data design and standardization into how features are built and how media campaigns are measured, while providing a consistent way of defining success across an entire company.

Upon building a new website feature or function, the first question asked should be, “How will we know if this is successful?” before adding it to your website. Has your Analytics team been consulted with to determine how to track new content via Google Tag Manager, or will the feature be captured by existing on-element tags? No feature should go live without basic tracking – make that your deal-breaker, and don't budge on it. 

Another important question to ask in tandem to the above is, “What is motivating us to add this component?” Is it a primal urge to produce features to meet a status quo, or a verified and quantifiable set of data points which identify your users' problem or need? If you aren’t asking and fully answering these questions, you aren’t doing yourself or your coworkers any favors. Don't waste your time or anyone else's – life is too short to not think about data!

As much as I enjoy giving those folks a hard time, these concepts do not apply only to code slingers. When an email is sent or a media campaign is sending traffic from off-site, are UTM parameters being added to links in a consistent manner that allows any Google Analytics user to compare and quantify over periods of time and different campaign types? If not, you’re missing the mark there, too. 

Standards are extremely important to consider when building analytics into existing processes. Without a defined method of measurement and consistent set of naming conventions, every user can (and will) report their own results uniquely, and roll-up reporting will be nearly impossible. (Trust me, speaking from experience: it's a nightmare.) A defined measurement method allows for apples-to-apples results across all pages, traffic channels, and users, while a consistent set of naming conventions makes concrete reporting (at any level of detail or management) a manageable task. For example, setting a specific standard for UTM medium parameters which can be used avoids issues with variations in capitalization, spacing, or naming where mediums like “cpc”, “ppc”, “paid search”, and “CPC” are the same in a marketer’s eyes, but look different to Google Analytics.

Another important item to consider is user access: who's viewing, modifying, and reporting your data? If you control this part of the system, it's okay to be a control freak. I understand and appreciate you for it. Control is necessary, and while it's fine to hand out unfettered analytics credentials like they're the latest iPhone and you're Steve Jobs circa October 2011, know your limits. Manage and delegate appropriately, because it'll come right back to you if it goes wrong. Train your users twice before giving them access to an analytics tool, and assure the tool is both: A. relatively intuitive to use in the first place, and B. set up to serve those users upon first login. I wouldn't give anyone except my devs access to Tealium, just like I wouldn't give marketing users access to an unfiltered Google Analytics account. Make sure shared assets are readily available, especially since some tools place limits on shared reports, segments, and goals. Sometimes, the best answer to a request for access is, "Why?" Would it take less time to build that requestor an evergreen Custom Report than it would to teach them the intricacies of Google Analytics and Data Studio? Alternatively, would a one-time ad-hoc report satisfy the request for at least another quarter? Again, know your limits, and your audience.

There's so much more to dig into around analytics process and best practices, which I'll cover in a later post, but for now, Google is your friend. The ramblings – er, musings – of LunaMetrics and Simo Ahava are great places to start. As some may recognize, I'm also trying to channel the legendary Avinash Kaushik in this post.

Final Thoughts

From the beginning of the ideation and development cycles to the end of a campaign where results are finally reported, analytics should be reflected on, always. The more you know about analytics and its context in your organization, the better questions you ask – and in turn, the more analytics-minded you become. In the long run, this can only help you become more proactive and effective in all you do – and your organization will thank you as it grows and prospers. 

© Chrisdazzo Consulting, LLC 2024

Get in touch